The Power Grid
 Alex Anderson 🚀, March 23, 2023
Special thanks for Matt Ricks and Natalie Anderson, along with everyone who's commented on discussions, for their contributions to these ideas.
Thorium Nova's simulations are a bit more in-depth than its predecessors, so I figured it might be helpful to write up a little bit about how the specific parts of the simulation fit together. Today we'll talk about the power grid, which is more complicated than you might expect.
The vision here is to fulfill that sci-fi dream of having the captain should "Reroute power to the shields!" and have that actually mean something. Power is an important part of how the ship runs, but there are many paths we can take to build this into the controls.
Power Distribution in Thorium Classic
Power distribution is much simpler in Thorium Classic.
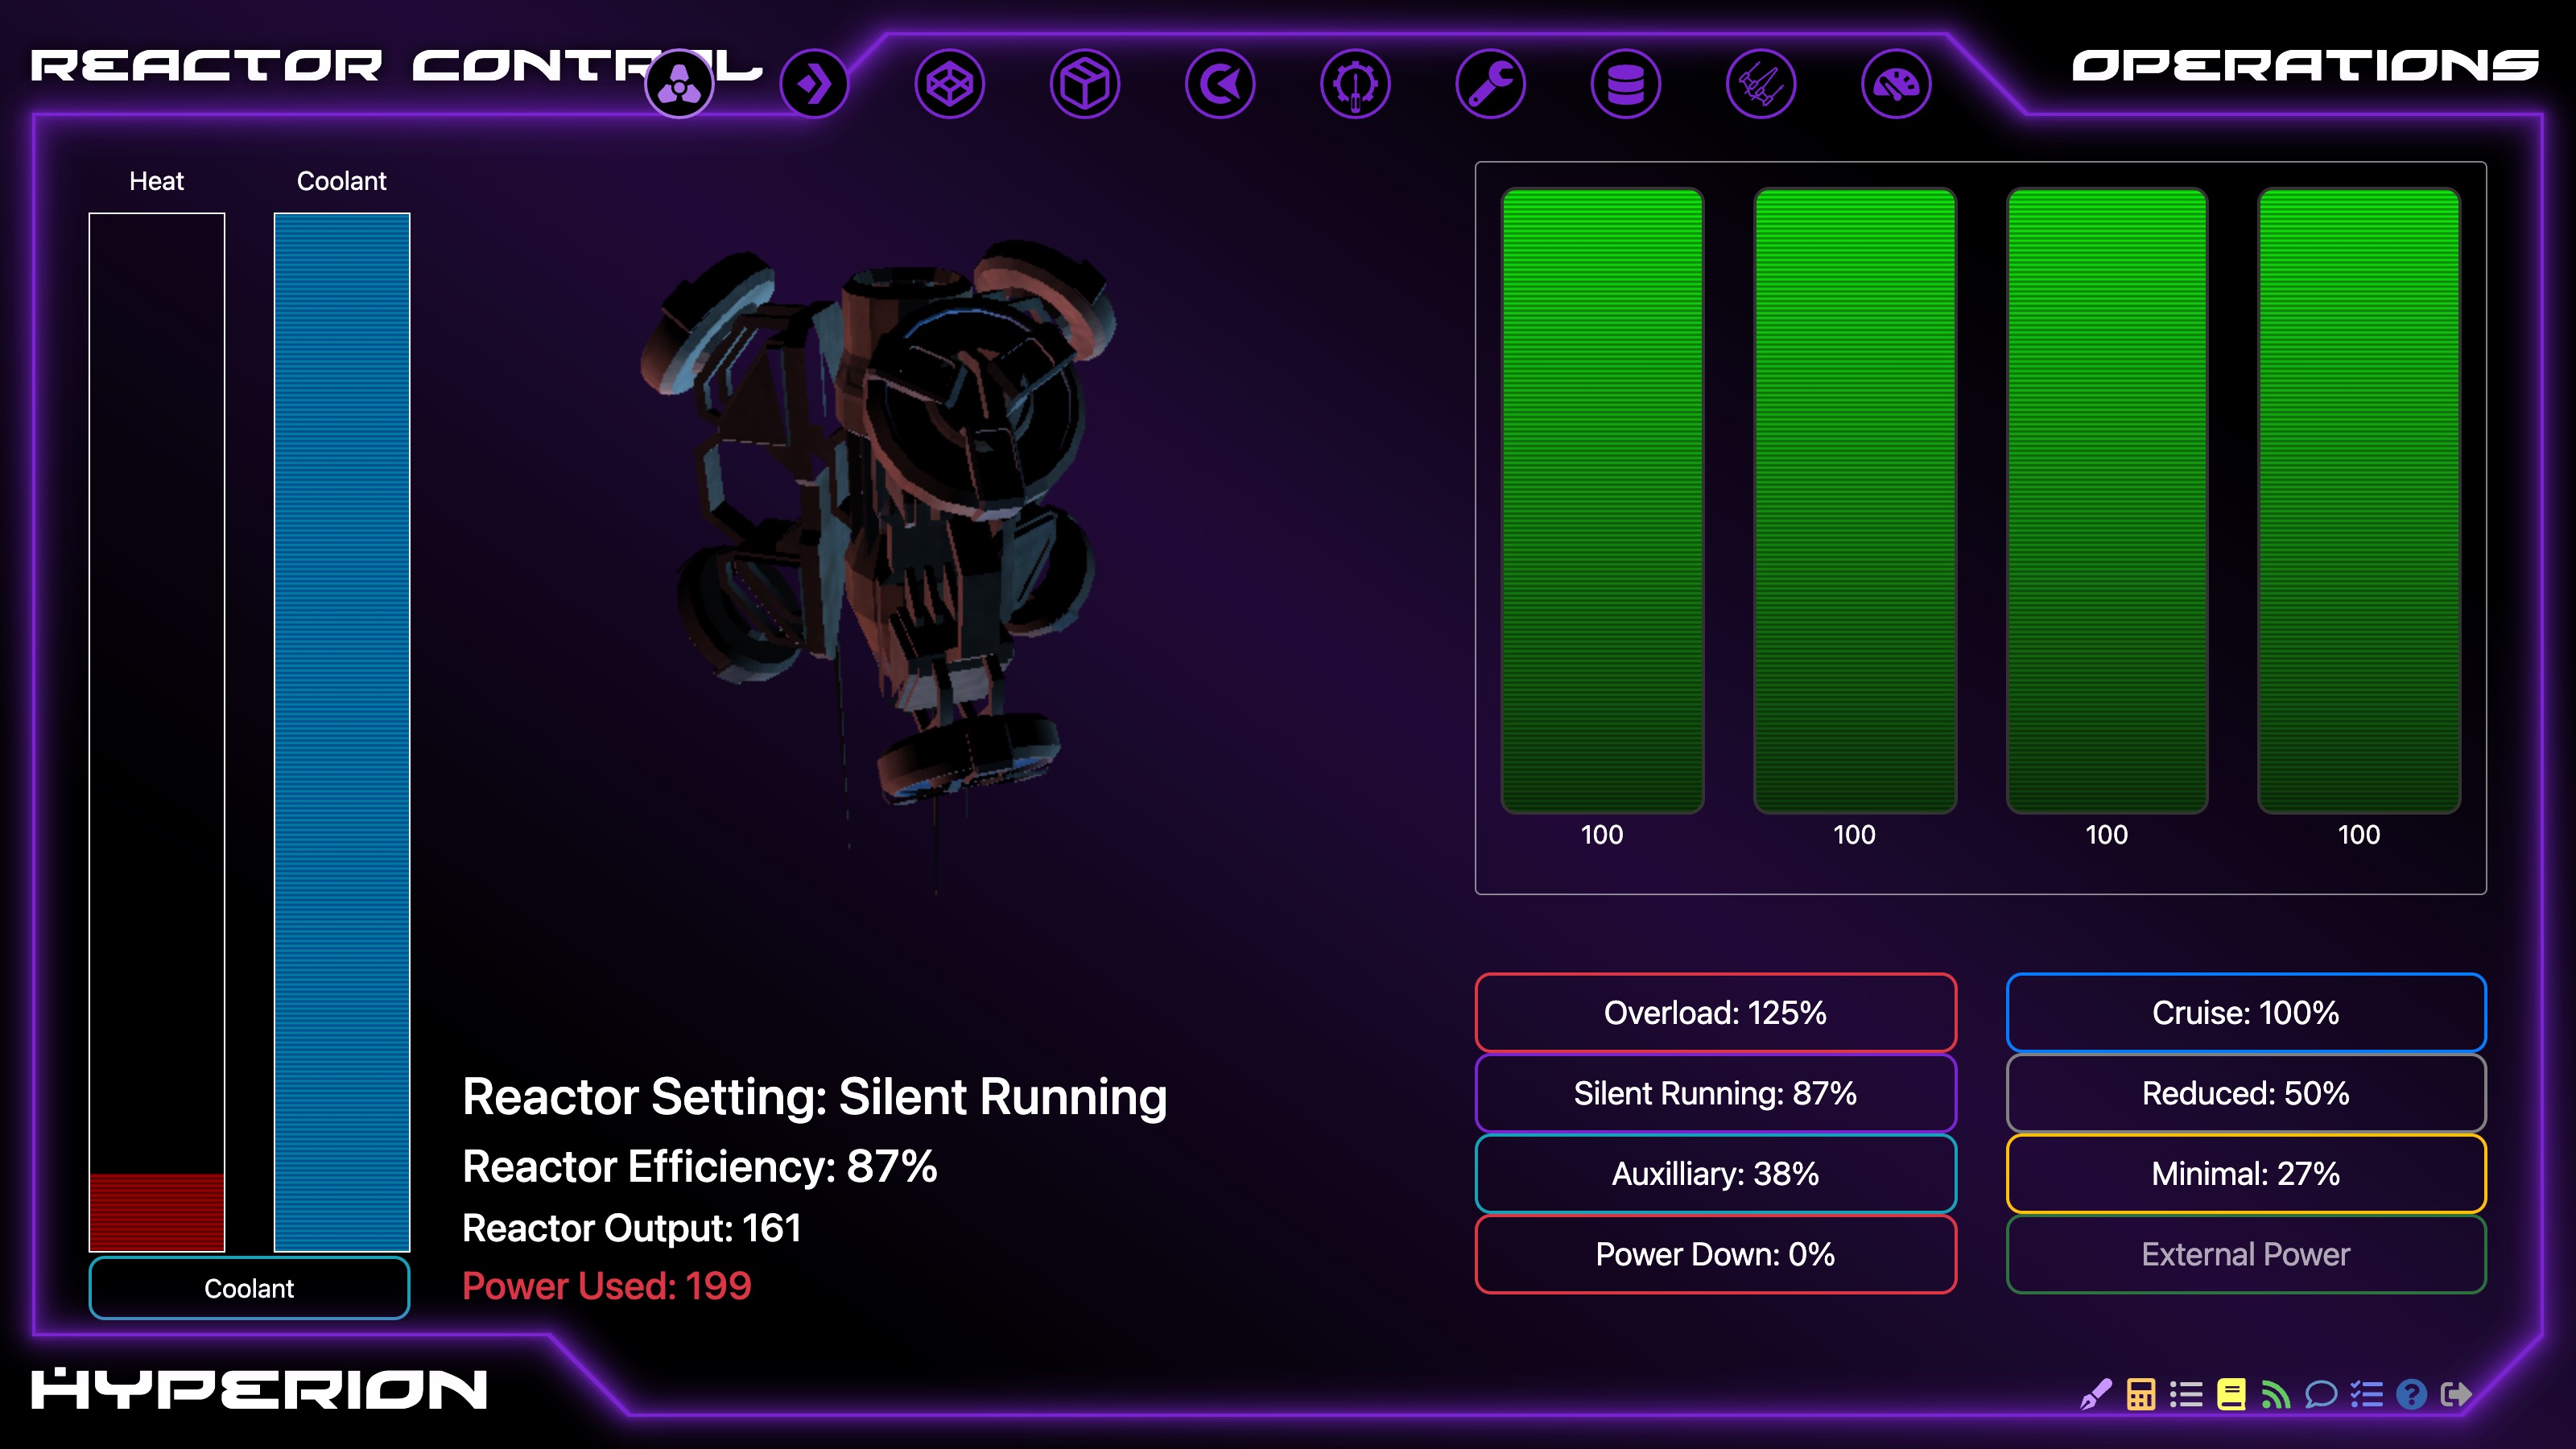
Power is magically* generated by a single reactor, which can be set to a higher or lower power output, at the expense of changing how fast the reactor heats up. Fortunately, crews can cool the reactor instantly by flushing coolant through, but coolant is a limited resource. If the reactor gets too hot, it could explode (at the whim of the Flight Director, it never explodes automatically).
* By magically, I mean the power comes from thin air. There isn't a concept of consumable fuel or renewable energy source.
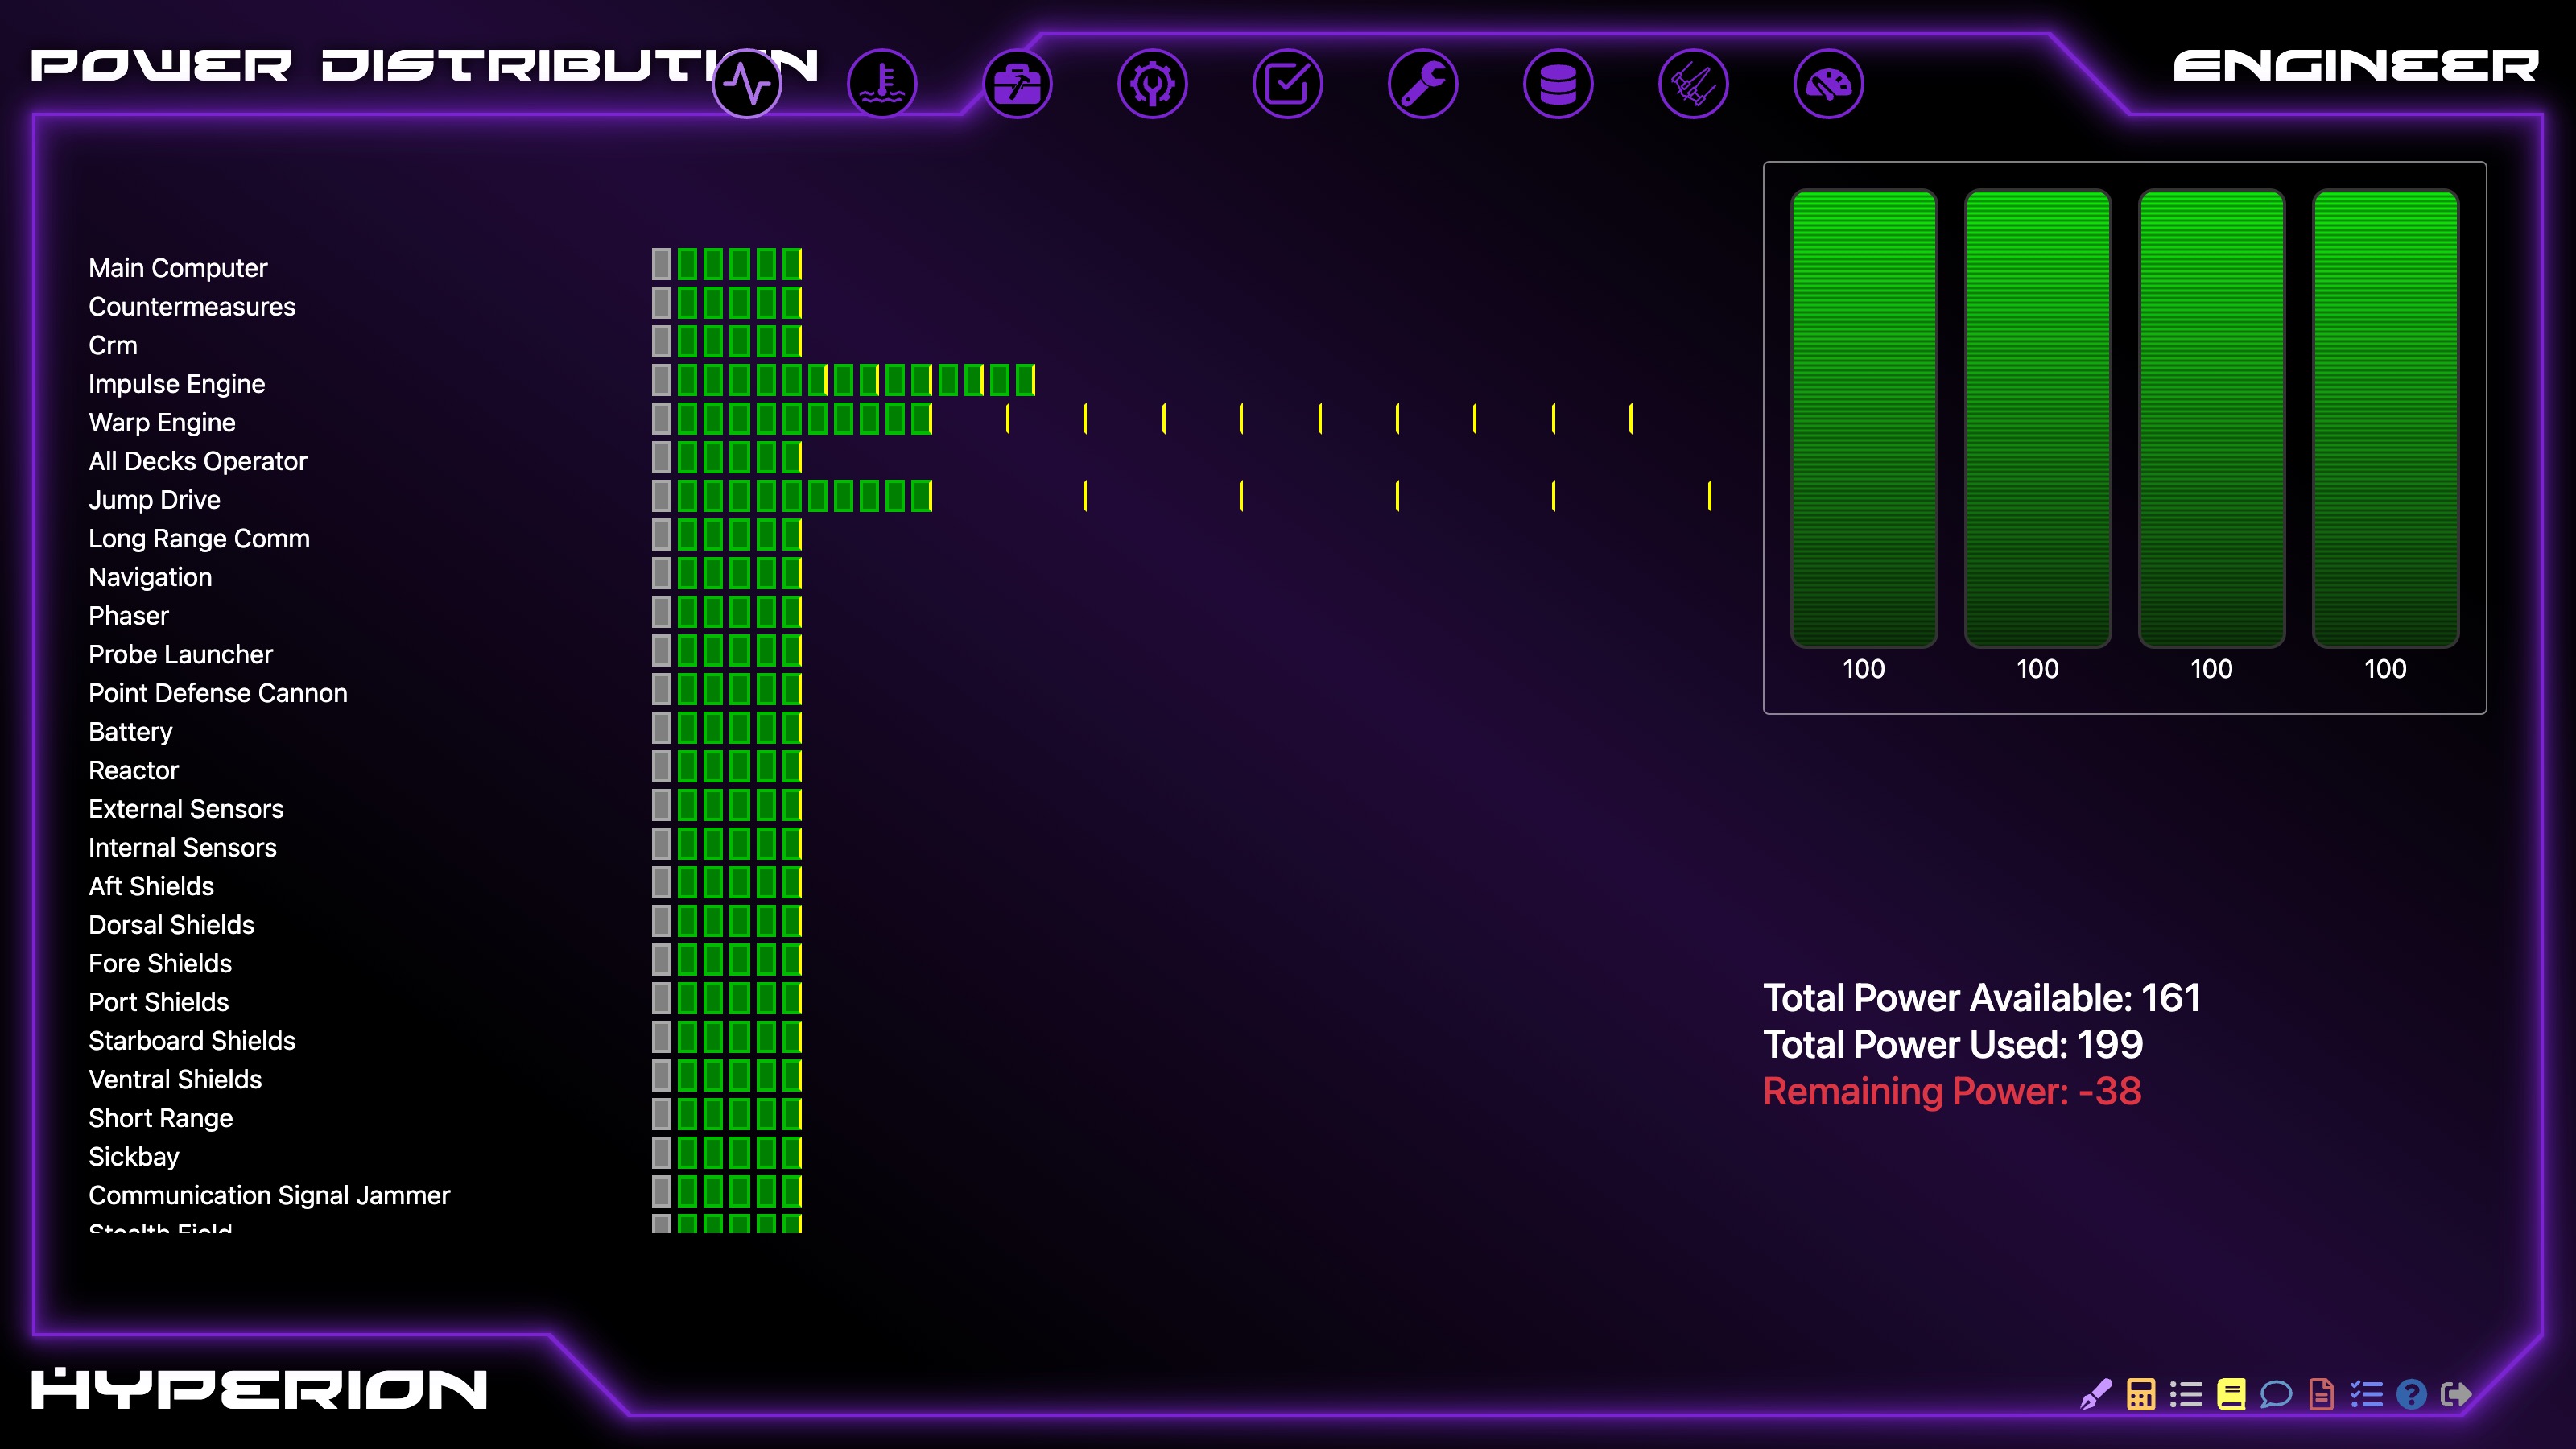
Power distribution is pretty simple - drag the green bars up to the yellow lines to make the systems work. Putting it to a further yellow line will make the system work better, like letting the engines run faster. Removing power will immediately cause the system to stop working.
At the bottom of the screen, it shows how much power is provided by the reactor, how much power is being used, and the difference. For ships with batteries, excess power is drawn from the batteries until they are empty. With no extra battery power, the power grid is "unbalanced", and the Flight Director can impose whatever consequence they want for that.
There are a lot of bonuses to this. It's simple and easy to understand. There are few moving pieces. The Flight Director has the prerogative to be lax with enforcing unbalanced power.
But it also doesn't demonstrate a lot of realism, and is often derided as being a "boring" station. While the best power distribution crew quickly and optimally move power in and out of systems, most just adjust it as needed (read: when someone is yelling at them because their system isn't working).
So, the goal for Thorium Nova was to create something a little more realistic and engaging for the player running power distribution.
Thorium Nova Power Distribution
To help understand the power distribution simulation, we'll specifically look at how it works with the Impulse Engines.
Efficiency
Before we talk about anything, though, we need to address efficiency. This is a replacement for outright damaging systems, and allows for a continuum of damage that negatively affect the system instead of just deactivating it. Systems lose efficiency automatically through entropy, or through excess heat, overloading the system's power, or taking actual damage from battle.
When a system has decreased efficiency, it requires more power to operate at the same effectiveness. Maintenance officers will need to monitor and prioritize which systems to focus their efforts on to keep the ship running as... well, efficiently as possible.
Ship Systems
Unlike Thorium Classic, when it comes to power distribution we need to start with the systems instead of the reactor. The simulation first looks at how much power each system is trying to use. For impulse engines, that means checking if the engines are on, and which speed they are trying to go. When the systems are configured before the flight, they are given a "minimum power", "default power", and "max safe power" - we'll get to what "safe" means in a minute.
So when the impulse engines are at 1/4 impulse, they'll draw the "minimum power" amount, while full impulse draws the "max safe power". But whether the power grid actually provides the power that it needs is a bit more complicated.
So, back to the reactors we go!
Reactors
That's right, more than one reactor. This provides a bit of added complexity in exchange for redundancy and more flexibility in where power comes from. Power is generated by taking fuel from the inventory and converting it into energy. That means that the Quartermaster will have to make sure all of the reactors are fully stocked with the appropriate fuel.
Before the flight, reactors are configured with a max output and an optimal output, which determines the fuel-to-power efficiency. Producing more power than that optimal output will consume fuel at a higher rate.
That means the crew has the ability to choose how much power the reactor will output to strike the best balance between power needs and fuel consumption. Of course, it's not possible to produce more power than the maximum output of the reactor.
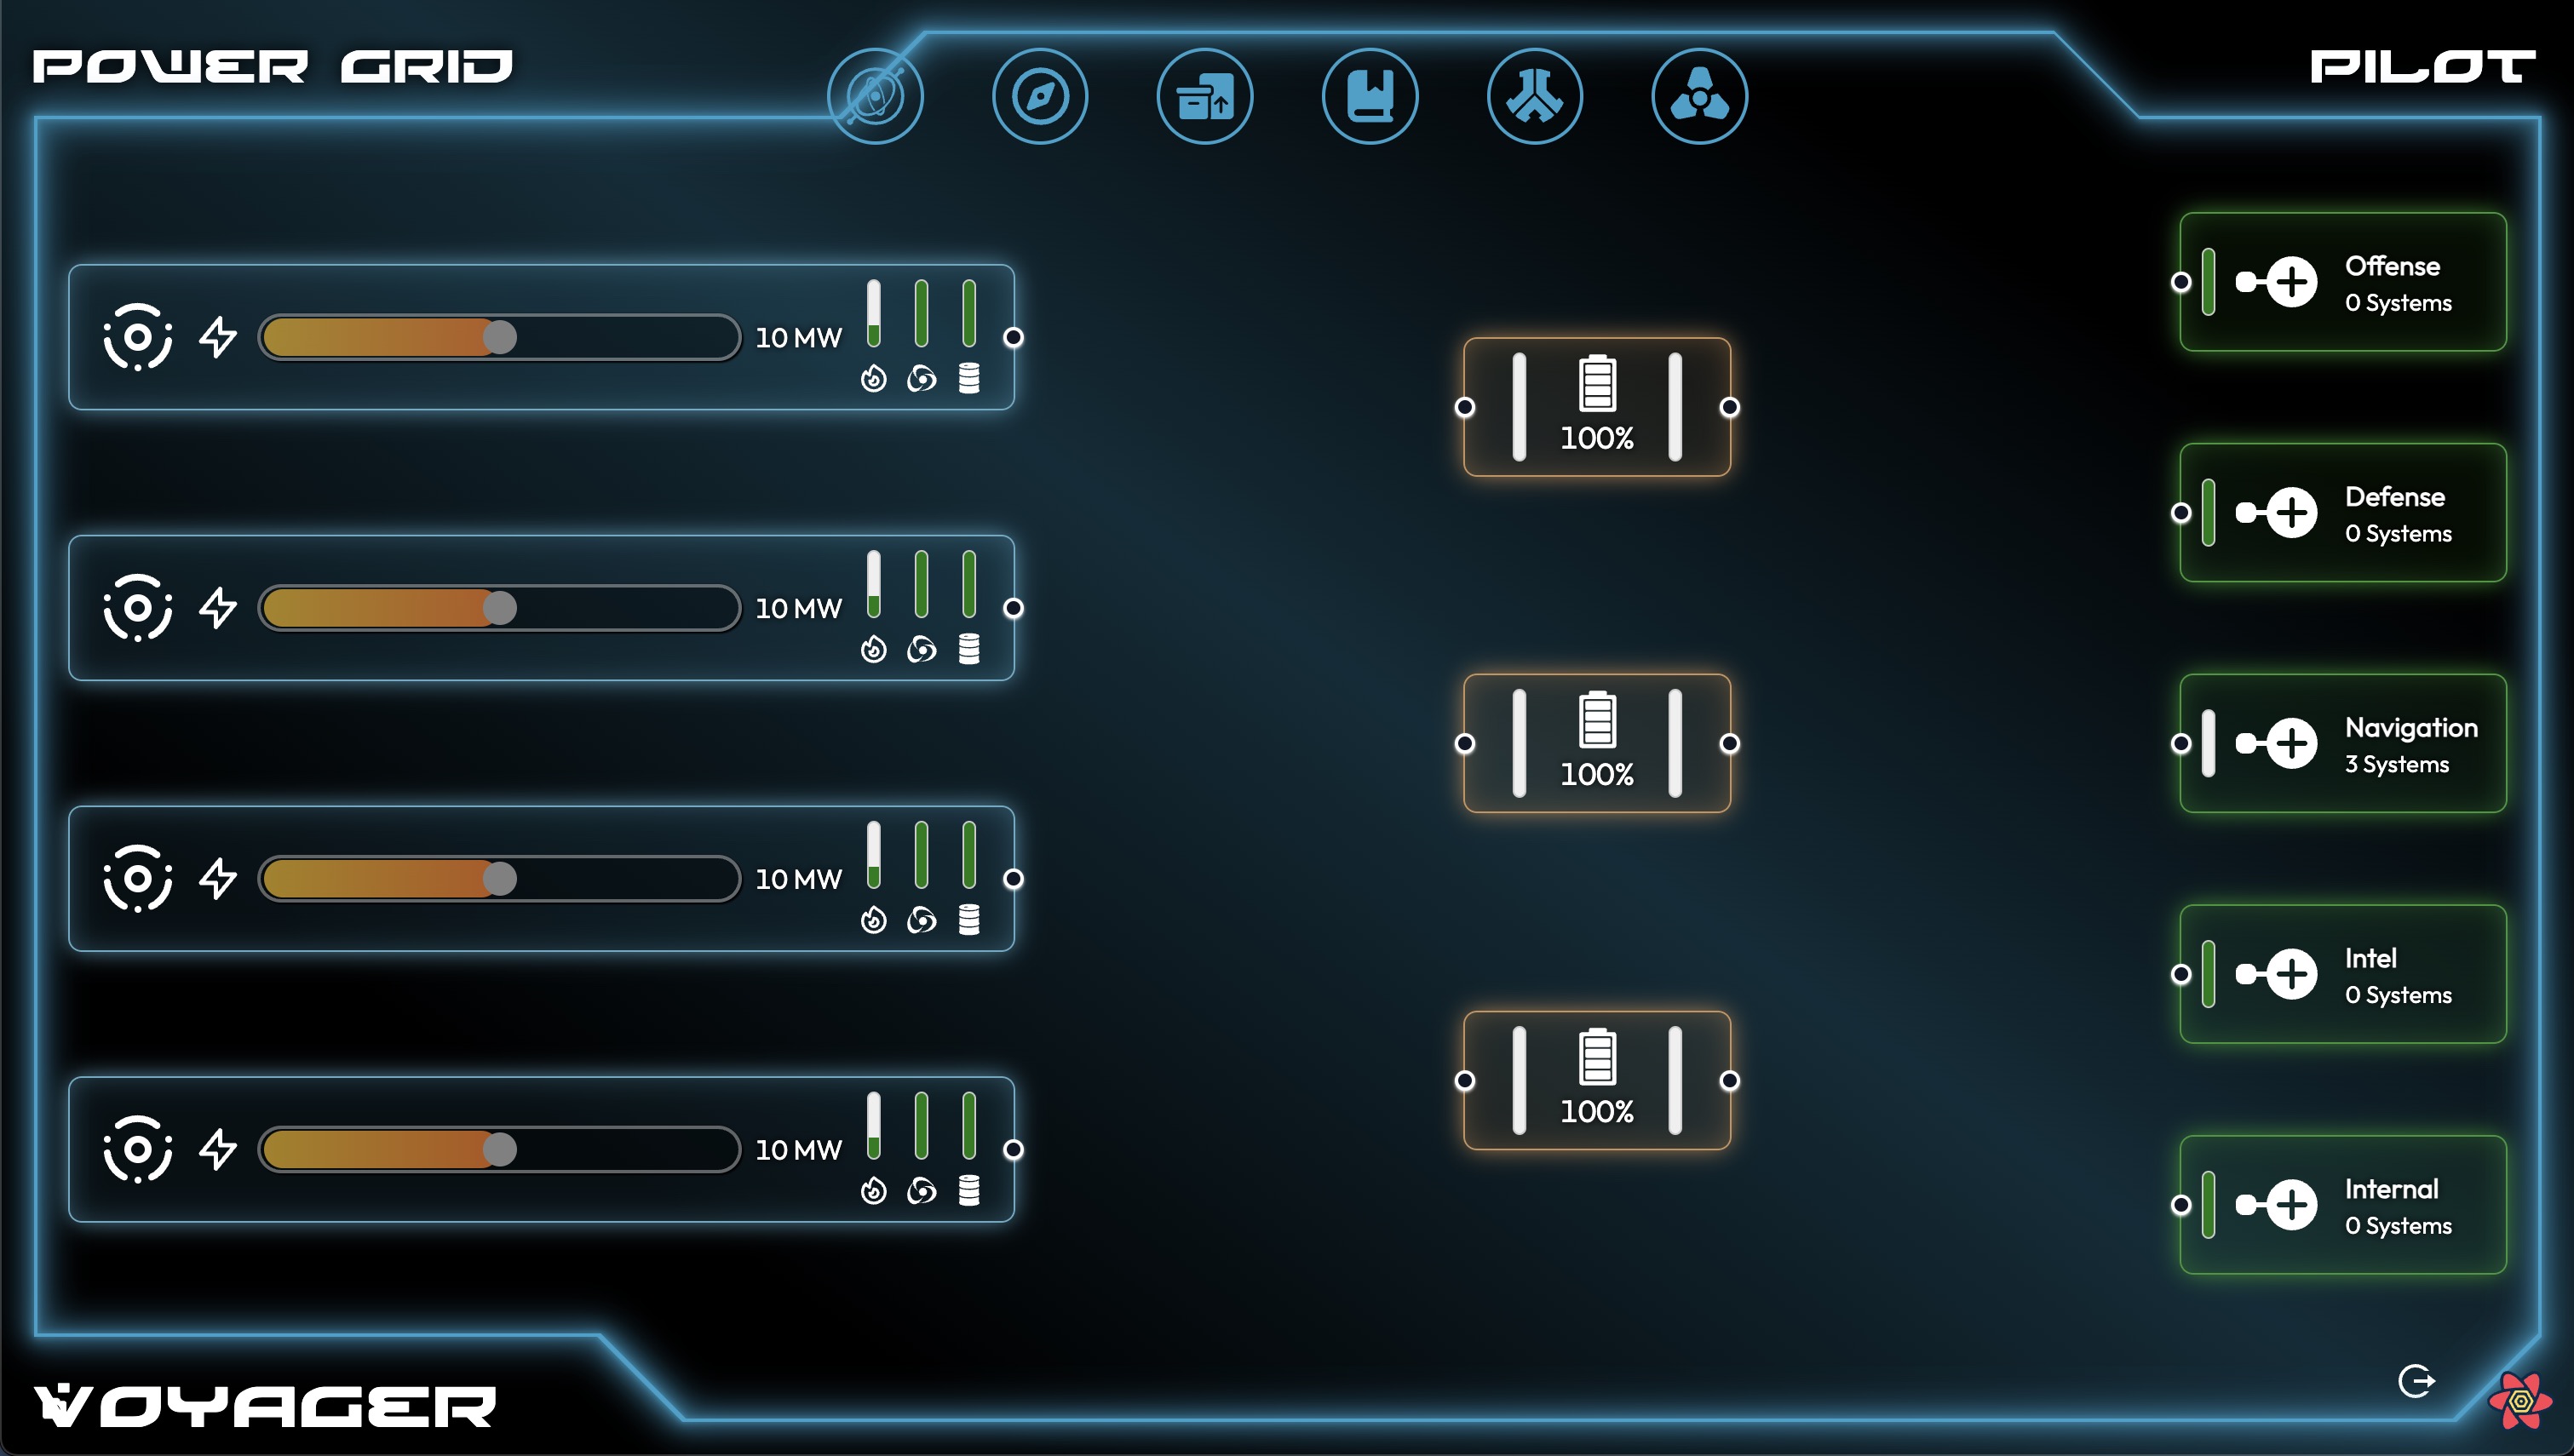
Reactors create a power grid by connecting to power nodes and batteries. Reactors will always evenly distribute their power among power nodes, giving power to each power node until that power node's requirements are satisfied, so each power node gets at least some power. Any extra power is then used to charge connected batteries.
Power Nodes
Power nodes receive power from reactors and batteries and distribute that power to the connected systems. Multiple connections can be made to an individual power node, but to keep crews from putting all their systems into one power node and dumping all their power into it, power nodes will have a limit to the number of connected systems they'll accept.
Systems can only be attached to one power node at a time, but they can be moved from one power node to another at any time. By default, similar systems will be grouped into the same power node.
Weapons Power Node:
- Phasers
- Point-defense Railguns
- Targeting
- Torpedoes
Defense* Power Node:
- Shields
- Tractor Beam
- Transporters
- Stealth Field
Engines Power Node:
- Warp Engines
- Impulse Engines
- Thrusters
- Navigation
- Jump Drive
Intel Power Node:
- Long Range Communications
- Short Range Communications
- Sensors
- Probes
- Signal Jammer
- Countermeasures
Internal Power Node:
- Life Support
- Main Computer
- Internal Sensors
- Sickbay
- Security Force Fields
- Turbolift/Cargo Containers
* Defense includes any systems that cannot be used when the shields are raised so the crew can choose between using shields or using the other systems.
These defaults should provide a good balance of power use among the different systems and power nodes, but of course the crew could readjust things if they saw the need.
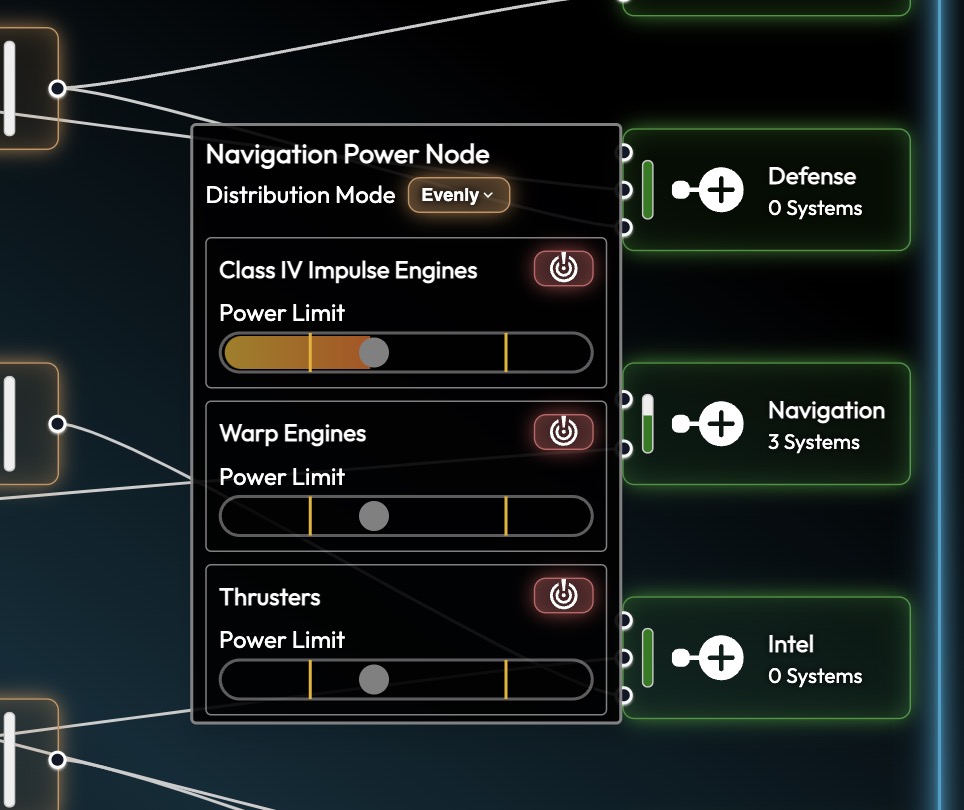
Crews can also choose how power is distributed within a power node. This is where the system's power draw comes into play. Power nodes can distribute power evenly between their systems, like with reactors, where each system gets at least some power. Once a system reaches its power draw level, it stops getting power, and more is distributed to the other systems.
The other options include "least-first", where the system with the least power draw gets its power first, and "most-first", where the system with the most power draw gets its power first.
The crew in charge of the power grid will have to balance how many batteries and reactors are connected to power nodes, which systems are assigned to the power node, and which distribution mode each power node is using to make sure systems get the power that they need.
If a system doesn't fulfill its power draw, it will only be as effective as the amount of power that it has. For our impulse engines, that means if our engines are set to full impulse but there's only enough power for 1/2 impulse, we'll only be able to go 1/2 impulse.
Efficiency also plays into this. If impulse engines are running at 50% efficiency and attempting to go at full impulse, it will draw twice as much power. If the power grid can't supply that much power, they will only run at the 1/2 impulse speed.
Fortunately, batteries can alleviate some of the stress of the power grid.
Batteries
Batteries are there for when you need a small boost for a little while. They are charged by reactors, connect to power nodes, and can store a certain amount of power. They also have separate charge and discharge rates, which will be important later on.
By connecting a battery to a power node, that power node effectively has a buffer of time where the systems will get however much power the battery can supply for as long as its storage lasts. This might be helpful when you want to give some system a short boost, or if you want to make sure your critical systems always have some kind of power, even if something happens to your reactors.
Power will only be drawn from batteries if the reactors aren't providing enough power, and they'll be charged if the reactor connected to them isn't sending all of its power to the power nodes.
Phase Capacitor and Warp Dynamo
Batteries ability to charge and discharge at different rates can lead to some interesting behaviors. It's possible to create a battery that charges very slowly but discharges quickly, dumping a lot of power into a system all at once. This property will be used to create specialized batteries called the Warp Dynamo, which is used by the warp engines to make warp jumps, and Phase Capacitor which phasers use to fire powerful bursts.
The intention here is to provide extra power to systems that can't be obtained by one or two reactors at the same time. Instead, you spend time charging these special batteries until they've stored up a lot of power, and then release it all at once.
This adds two fascinating wrinkles to the power grid. First, the power grid operator has divert enough power to the Warp Dynamo and Phase Capacitors so they can be used when needed. The good news is there's no consequence for keeping these charged, which means phasers can be ready at a moments notice. But it also means the power grid operator has to keep a steady flow of power going into those "batteries".
Second, while they might be named "Warp Dynamo" and "Phase Capacitor", there's no reason they can't be used with other systems.
Overloading Systems
By default, systems will limit how much power they consume so they don't overload and damage themselves. Any extra power they consume over their max safe power level will damage them, causing efficiency to decrease. Though sometimes it might be worth it to push them a little bit, like when you need to run your engines faster to get away from enemies.
Overloading is a three-step process. First, you need to attach more than enough power to the power node that the system is a part of. This can be done with both reactors and batteries, including those special batteries mentioned above.
Next, the power grid operator needs to override the power setting on the individual system. This lets them say how much power a system should take. When they try to put it past the max safe power, a big red box will come up warning them of the danger of overloading the system, but they'll still be able to do it.
Finally, they need to use the system in a way that draws more power than normal. For impulse engines, running at full impulse will still only draw the max safe power. The Pilot has to activate emergency impulse to have the engines overload and draw more power. Other systems might automatically draw more power.
Heat
Like reactors, every system that uses power generates heat based on the amount of power that system is using. As a system's heat increases, that heat is transferred to coolant, which is an inventory item that can be transferred to the room with the system. When coolant is in the room, it's automatically pumped to a dedicated radiator which transfers the heat from the coolant into space.
Like power, there's also a max safe heat level. If the system gets any hotter than that, it will begin to experience a decrease in efficiency. Cooling the system requires either using less power so the radiators can catch up, or transferring cold coolant into the room to wick away some of that extra heat. But the heat in that coolant will have to be radiated into space at some point, so the crew will have to pay attention to it.
This could play into how easily a ship using Stealth Mode can be detected. It could be possible to reduce the heat signature of the ship by stockpiling cold coolant and then moving it into hot systems to quickly cool them down so the ship can't be seen as well.
That may all seem like a lot. And it is. But hopefully once this is used in practice, anything that isn't intuitive can be an advanced technique - not necessary for a regular flight, but an optimization that dedicated crews can take advantage of.
When I worked at the Space Center in my teenage years, we had a question on our crew surveys that asked "Did you feel you made a difference during the mission?" and it seemed the kid with the Power Distribution screen always had a hard time answering "Yes". Hopefully, with this new power grid setup, that never happens again.